
Time Flies By
This is part of the Weekly Photo Challenge: Motion
Copyright © 2015, Ben Aerssen. All rights reserved.
Time Flies By
This is part of the Weekly Photo Challenge: Motion
Copyright © 2015, Ben Aerssen. All rights reserved.
Filed under Hiker's Hangout, Photos
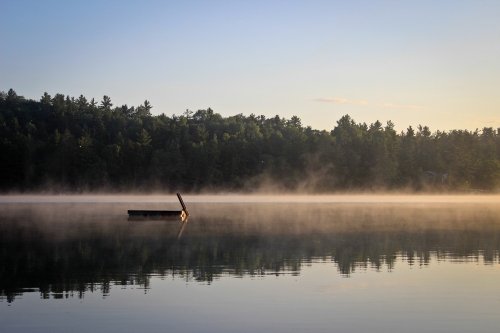
Smoke On The Water
This is part of the Weekly Photo Challenge: Reward
Copyright © 2015, Ben Aerssen. All rights reserved.
Filed under Hiker's Hangout, Photos
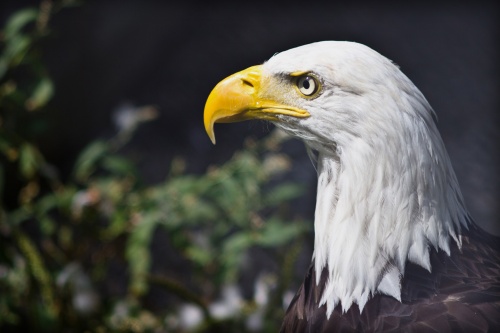
Piercing Gaze
This is part of the Weekly Photo Challenge: Rule Of Thirds
Copyright © 2015, Ben Aerssen. All rights reserved.
Filed under Hiker's Hangout, Photos

In honour of some of the coldest temperatures recorded so far during 2015 over in this part of Canada (as low as -40° Celsius or -40° Fahrenheit after the windchill), I thought I would review an essential piece of gear that always comes with me when I venture outdoors during the Winter – the Seirus Neo-Fleece Combo Scarf.
Pros:
Cons:
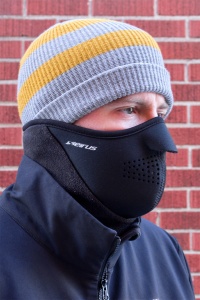
Don’t worry Ned Stark, I’ve braced myself for winter.
Review:
The Seirus Neo-Fleece Combo Scarf is definitely warm. You don’t have to worry there. The mask portion is made of Neofleece® – the durable neoprene outer material cuts the wind, while the soft fleece on the inside is comfortable against your face. The neck area is made of mid-weight fleece. You’ll want to make sure to tuck this section into your coat. The Velcro® closure system on the back makes it incredibly easy to fasten and take off again. Once its in place on your head, it stays put.
The Seirus Neo-Fleece Combo Scarf is lightweight; this makes it infinitely more efficient than a bulky knit scarf due to its minimal fabric use. When you don’t need it, you can just roll it up and stick it in your pocket.
There are small holes in the mask to allow for the hot air to escape when you’re breathing hard through your mouth. If you’re wearing glasses, breathing hard can occasionally fog them up. Sometimes, minimal condensation can form on the inside of the mask while breathing through the mouth as well. There is an opening on the underside of the nose allowing for easy breathing. A potential downside to these holes is that when the wind is extremely strong, it can sometimes find its way through into the mask. This occurs very rarely.
Since the Seirus Neo-Fleece Combo Scarf is made of synthetic materials, it can retain smells. My advice? Just don’t eat any garlic or sardines before you put the mask on and you’ll be fine. That being said, the mask is washable. If there happens to be any smells retained after use, they’ll only remain until the mask is washed.
Lastly, this great piece of winter gear is made in the USA.
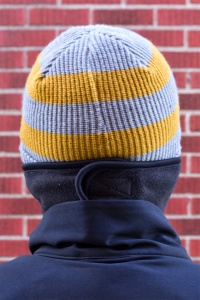
All snug and in place; Velcro is great!
Final Thoughts:
When it comes to the cold winter temperatures, it’s very important to cover up any exposed skin; frostbite is definitely not a fun time. Throw on the Seirus Neo-Fleece Combo Scarf and you’re covered. Bad puns aside, this face mask is excellent value for the money. I wear this pretty much every day during the winter. I’ve even bought a second one to have as a backup. Your friends will be jealous they don’t have one.

Copyright © 2015, Ben Aerssen. All rights reserved.
Filed under Clothing, Gear, Hiker's Hangout, Winter
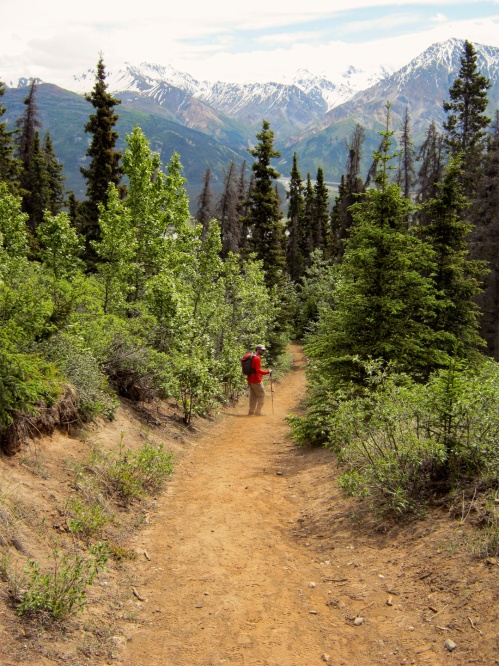
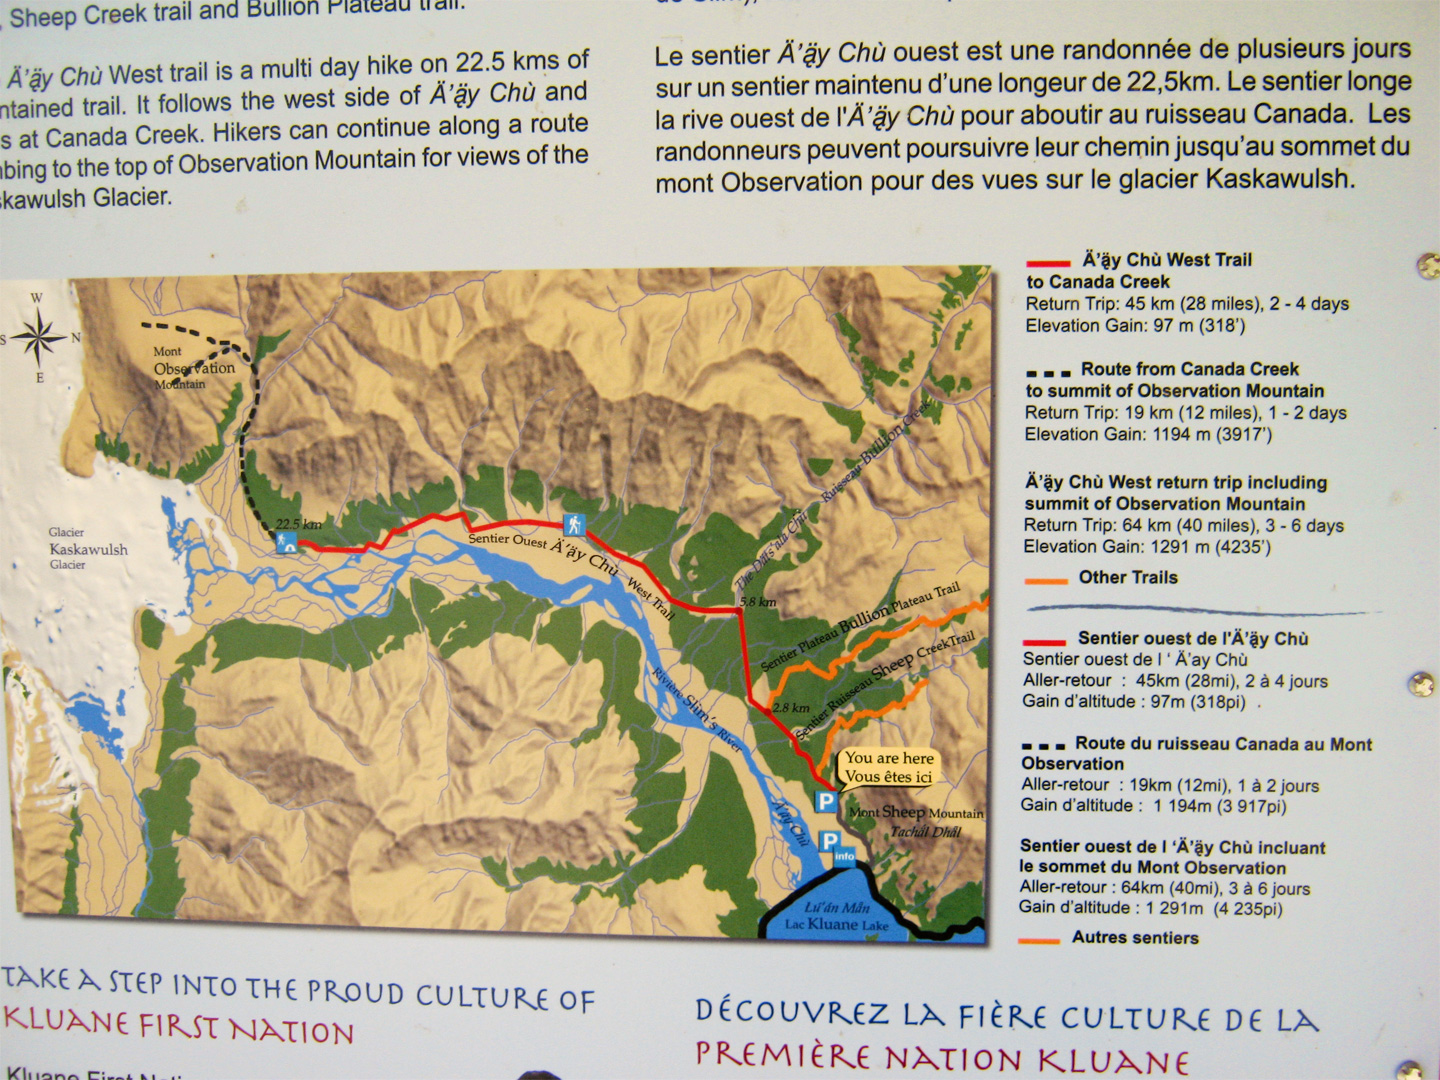
Time to spot some sheep!
Region: Sheep Mountain – Kluane National Park of Canada, Yukon, Canada
Return Trip: 10km (6 mi), 3-6 hours
Trailhead Location: Near the parking area at the base of Sheep Mountain.
Elevation Gain: 427m (1400′)
Skill Level: Moderate
Hazards: Grizzly bears, moose, dust/debris, narrow trail on cliff side, high winds
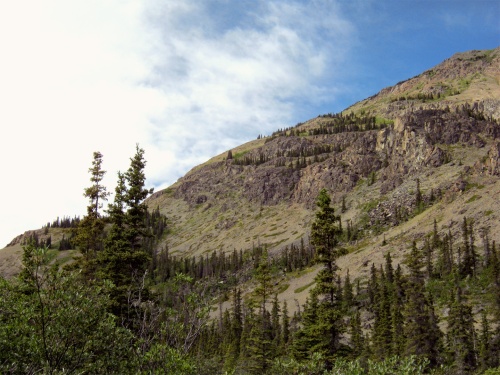
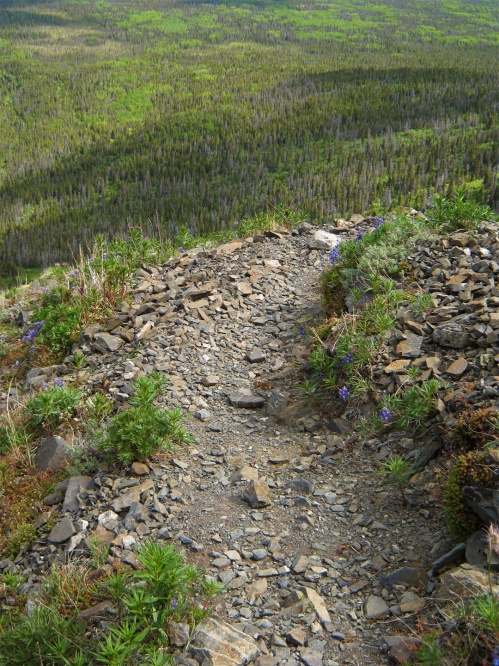
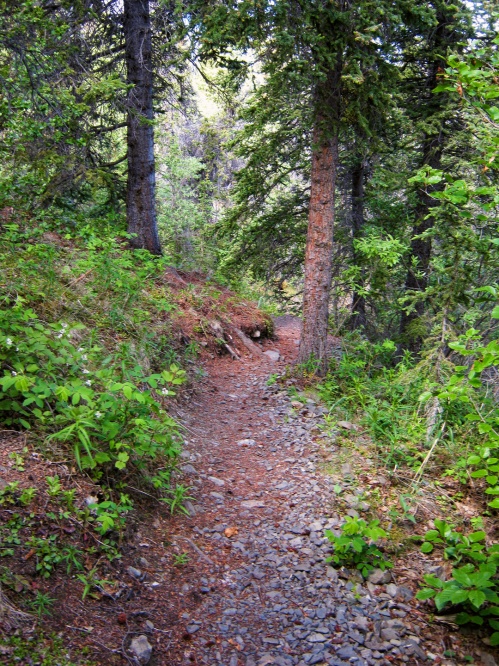
The second hike my wife and I completed while in the Yukon was along the Sheep Creek Trail.
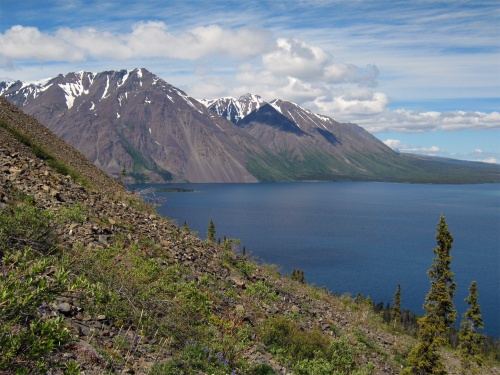
Sheep Mountain sits just across the Alaska Highway from Kluane Lake; the largest lake in the Yukon. It gets its name from the Dall Sheep that call the mountain their home.
Before starting up the trail, we stopped off at the Tachal Dhal Visitor Center. They had some telescopes set up facing the mountain, which the Parks Canada attendant had pointed at a group of sheep grazing for their breakfast.
After spotting the sheep and checking out the visitor center, we got back in the car and drove up the 2km pothole-infested dirt road to the trailhead. They warn people in smaller cars and RVs to hike up this road, since the potholes can get a little deep (roughly 2 feet deep in spots). As is the way of the Yukon, things tend to be a little bit bigger and a lot more wild; potholes are no exception.

You are here. Now go hike up a mountain.
The Sheep Creek Trail sees a lot more foot traffic than our newly conquered trail; King’s Throne. This means that bears are less of a danger, but caution is still the best practice. With our bear bells, bear mace and trusty mosquito head nets ready to go, we started up the trail.
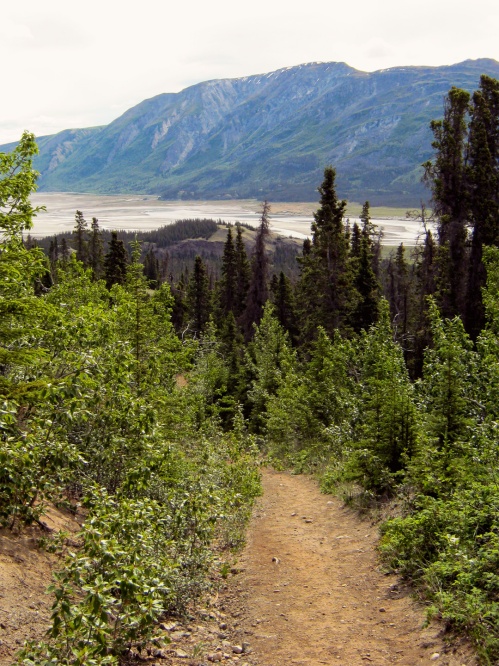
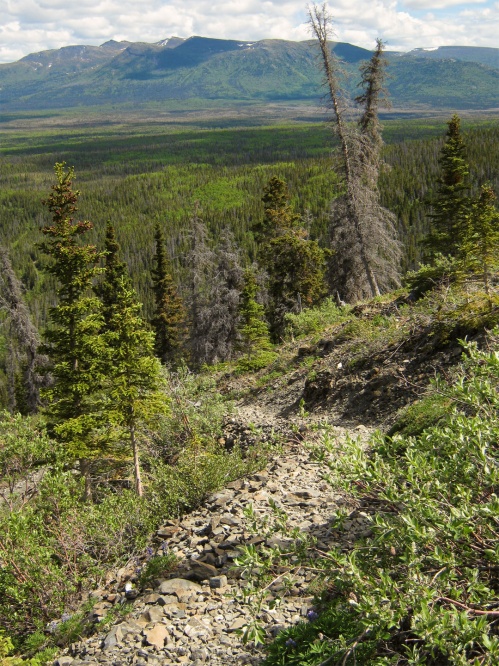
Looking back down the trail; Slim’s River is flowing into Kluane Lake.
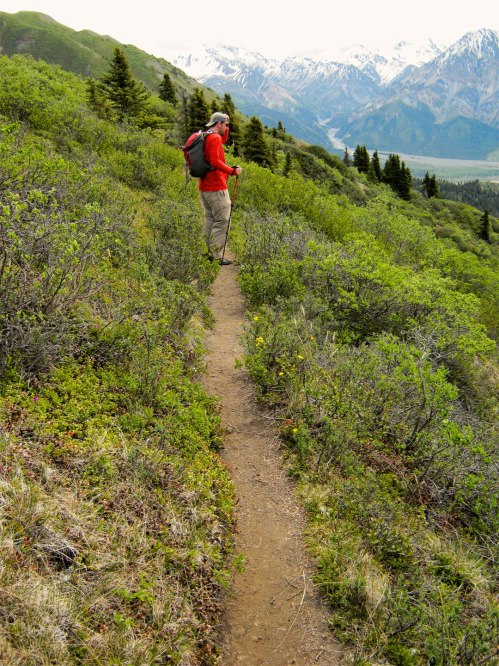
The good news was that the majority of the trail turned out to be wide enough for two people to hike side by side comfortably. It was also windy enough to keep the mosquitoes off us for a lot of the hike, even at the lower elevations. The not so good news? It is an unrelenting, uphill hike. Sure, there are a couple spots that level out for a few meters, but they really don’t last long at all. That’s just part of the fun though.
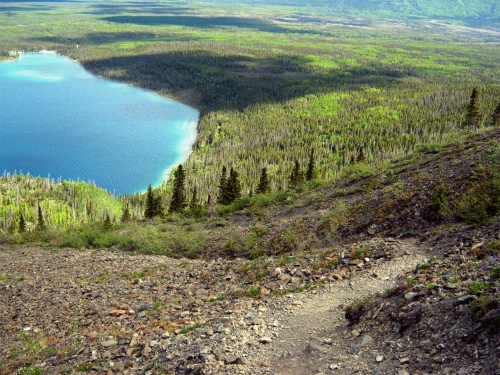
Facing in the direction of Kaskawulsh Glacier; the source of Slim’s River.
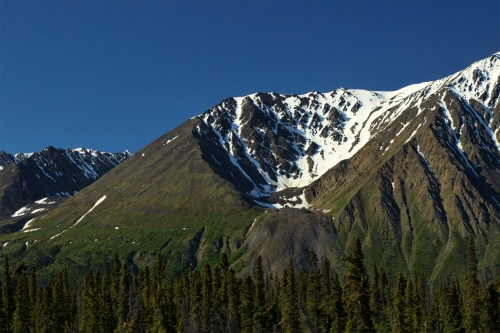
There were definitely some great views along the trek up. It was a nice clear and sunny day, with only a few clouds in the sky. We could follow Slim’s River as it meandered down all the way from the far off mountain range. Sidenote: That would be an excellent canoe trip.
Climbing higher and higher; you can almost smell the sheep.
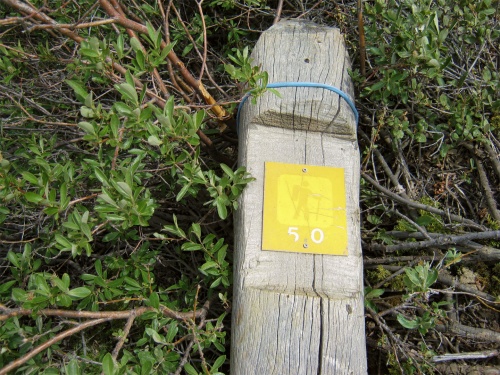
Reached the 5km lookout point. The wind must’ve knocked it down, or a grizzly.
Not getting too close to the edge; it’s a dead drop and a long way down.
Don’t pay those ridiculous salon prices for hair this good; hike a windy mountain.

Kaskawulsh Glacier is back there somewhere. [Click me!]
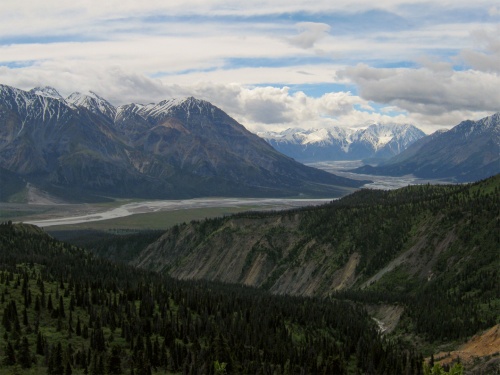
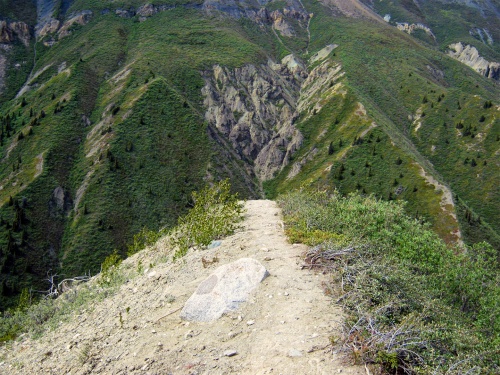
We made it up to the 5km lookout point, where the wind was extremely strong. So strong, in fact, that it might have been the cause of the fallen 5km point trail marker. After battling the high winds and pushing forward through a creeping fatigue courtesy of the hike up, we were treated to an intensely amazing view of the Yukon wilderness as far as the eye could see. It was definitely worth the effort to get to this ridge.
Being as windy as it was, we didn’t end up staying for very long here at the lookout. We started back down the trail to get out of the high winds.
Heading back down the trail and holding on to my hat…so windy up there!
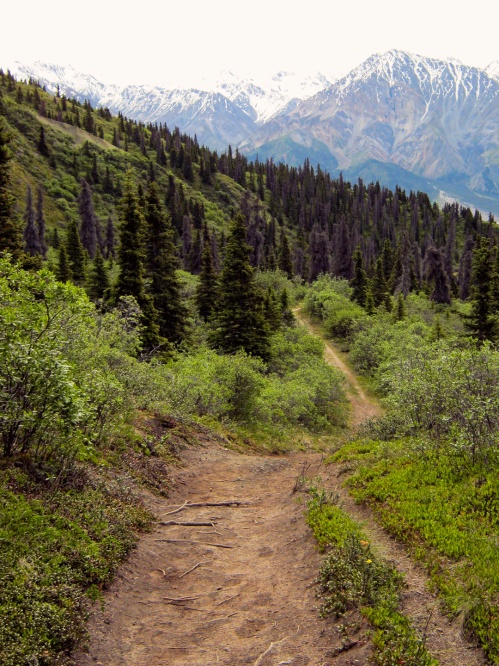
Back down into the trees. Due to a drought, the trail was very dusty.
The Kluane Lake region was experiencing a bit of a drought during our time there. This caused a good portion of the Sheep Creek Trail to be exceptionally dusty. The hike wasn’t so bad on the way up, but on the way down, we seemed to be engulfed in small dust clouds for most of the way.
Back at the parking area. What an awesome hike!
A little exhausted and very satisfied, we made it back to the car and jumped in after shaking off a couple stubborn mosquitoes that were still latched on to our clothes in a last ditch effort at a meal. Thank you Yukon, you definitely did not disappoint. Another memorable hike in the books.
Thanks again to my wife for helping out with some great shots along the trail. 🙂

Copyright © 2015, Ben Aerssen. All rights reserved.
Filed under Hiker's Hangout, Hiking, Trails
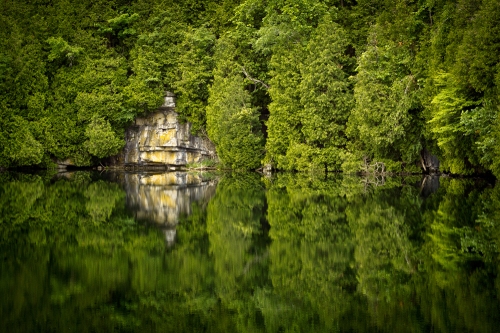
Crawford Lake, Milton, Ontario, Canada
This is part of the Weekly Photo Challenge: Symmetry
Copyright © 2015, Ben Aerssen. All rights reserved.
Filed under Hiker's Hangout, Photos
Hail to the King. A view of the mountain from below. [Click me!]
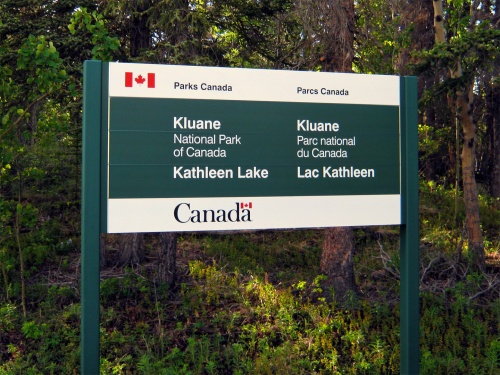
Region: Kathleen Lake – Kluane National Park of Canada, Yukon, Canada
Return Trip: 10km (6 mi), 4-6 hours
Trailhead Location: Old mining road near the parking area at Kathleen Lake.
Elevation Gain: 548m (1800′)
Skill Level: Difficult
Hazards: Grizzly bears, black bears, moose, avalanches, rock slides, loose rock, narrow trail on cliff side
In June of 2014, my wife and I were fortunate enough to be able to make our way up to the Yukon for a few weeks. We had planned a few hikes for our time up there, the first being the King’s Throne Trail. Yep. Hiking up a mountain. Go big or go home, right?
King’s Throne towers above the beautiful, blue waters of Kathleen Lake. Both are located within the boundaries of Kluane National Park of Canada.
Now entering Kathleen Lake – Kluane National Park. Let the adventure begin.
That’s a lot of switchbacks; must be a little steep.
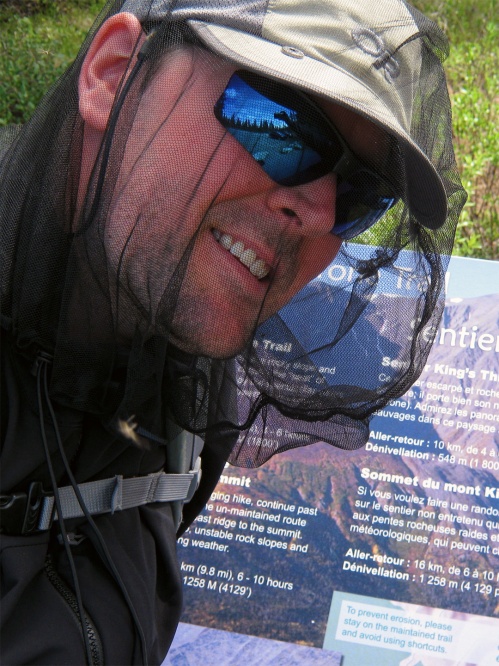
Having already hiked several kilometers of the Cottonwood Trail (following the mountain’s base) the afternoon before, we knew what to expect along the trail at this lower elevation; mosquitoes. Not just your run of the mill little blood suckers, but the gigantic, mutant variety that spawn only up in the Yukon. Huge, hungry swarms of them. Luckily we came equipped with mesh head nets. These were such a cheap investment and they turned out to be money extremely well spent.
With mosquito head nets in place, bear spray latched on to my belt and bear bells on our packs, we set off down the old mining road alongside Kathleen Lake.
While hiking down this first stretch, we came across a few older grizzly bear paw prints imbedded in the mud. By this point, we had already launched into several choruses of “Hey bear! Hey bear!” with a little jingle jingle from the bells and some clapping. We were now repeating our performance for the bears a little more often. Better to warn any bears we’re coming, then happen to sneak up on an unsuspecting mama bear. That would definitely not end well…for us.
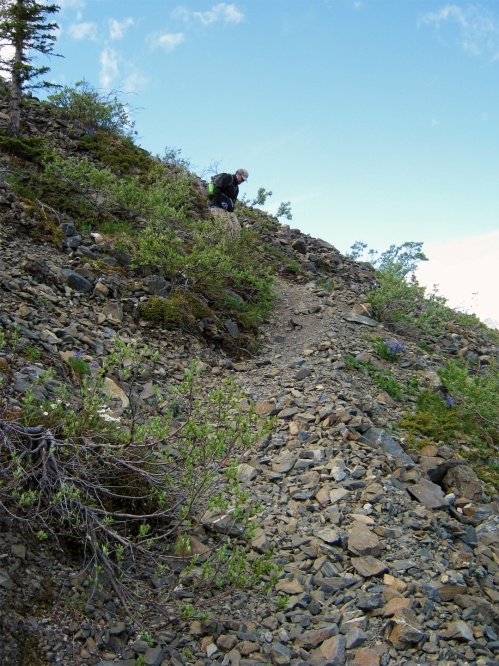
The trail is fairly easy in the lower elevation, so we made good time here. As the trail started to rise up higher and higher along the mountain, it suddenly became more rocky. At the same time, we noticed that the trail had become quite steep in areas. This is where we started hitting the first of many switchbacks. Since we were concentrating on climbing up some steep trail bits, we didn’t stop to take photos until we were almost up out of the trees.
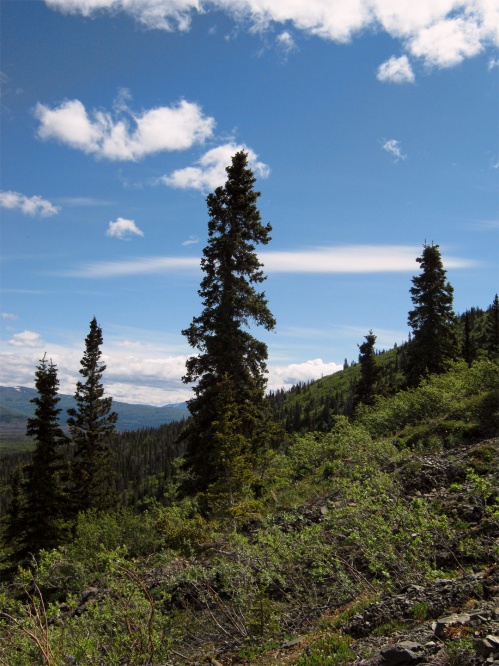
The trees are thinning out at this height. Only the strong survive.
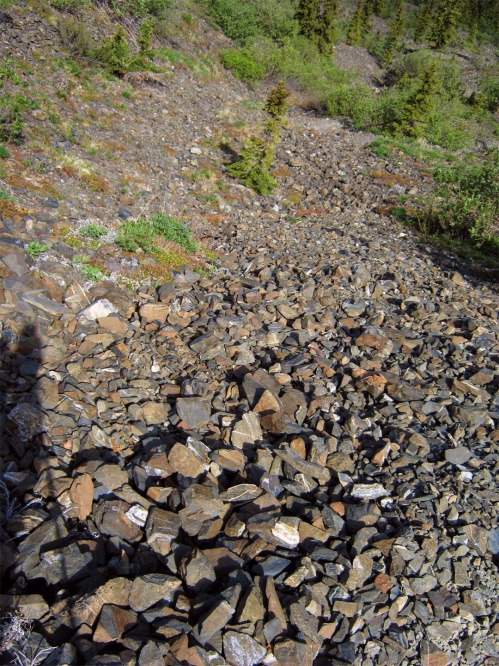
Careful with your footing, or you’ll be tumbling for a good distance. No pressure.
Part of the view on the way up. Motivation.
Taking a breather after a very steep incline.
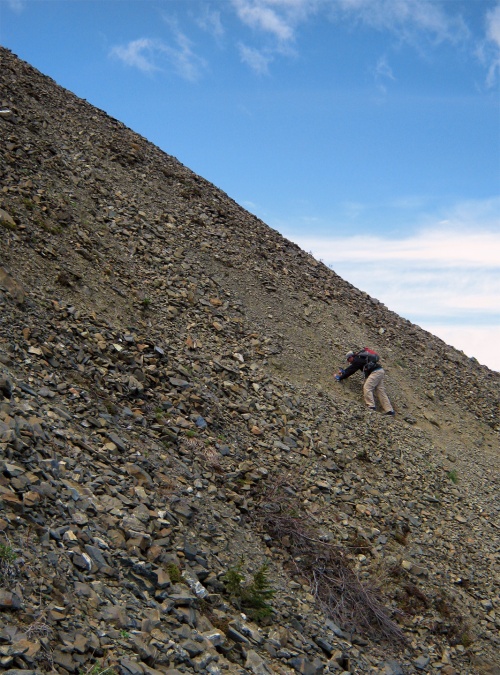
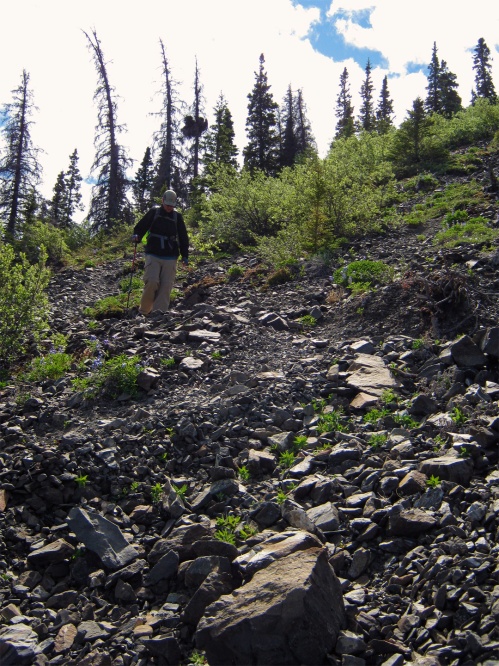
One foot at a time as I shimmy up along the very narrow “trail” in the scree.
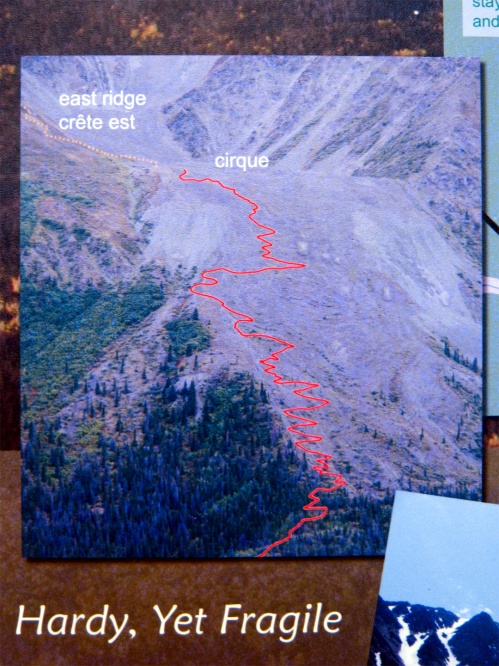
I have a special memory about this area of the trail because it was pretty damned scary; both on the way up and then down again. One particular spot here seemed to have fallen victim to a couple of rock slides. In effect, the already narrow trail (about 10″ wide here) had been cut away in two places creating two 4 foot gaps. Luckily, there was a tiny section of trail still in tact sitting all lonely and stubborn between the two affected areas of trail. Let’s call this small trail portion “Trail Island”. To reach the proper trail once again, you had to take a giant step across the first 4 foot section of nothingness and have your foot hit the 14 inch section of “Trail Island”. After managing to bring both feet over onto “Trail Island”, you then had to balance yourself and once again take a giant step across the second 4 foot gap in the trail. I can tell you from experience that when you’re a size 12 shoe, trying to not only fit my two feet onto a space of about 14″x6″, but also trying to balance my body weight and gear all at the same time is sort of a challenge. I guess it’s a good thing I had a mountain to partially balance my weight on. The other thing that my wife and I can be thankful for in this situation is that we both have long legs. It definitely worked to our advantage. This was one of those times where a certain cliché phrase popped into my mind…”Don’t look down!”. Great, thanks for the useful tip brain.
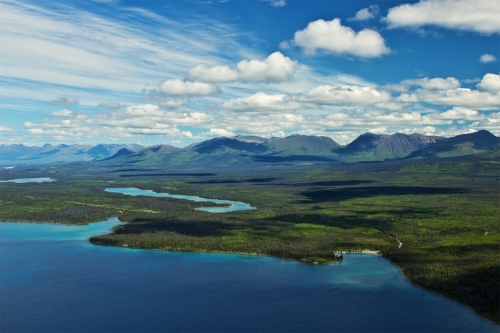
We made it! Time to sit back and enjoy the amazing view. [Click me!]
We sat up there for a while just taking it all in. It was quite the accomplishment. We decided to eat our victory snack – good old Clif bars – and washed them down with some water. We didn’t have anywhere else to be but up there. It was such a great feeling. After some time had passed, we eventually decided that we should start heading back down from our quiet, little spot at the top of the world.
It started to get a little chilly after resting for a bit. Ready to head back down now.
The trees are starting to reappear. No mutant mosquitoes at this elevation though.
My hiking pole came in really handy here. My knees were very thankful.
A little less steep, just as many loose rocks.
Back down to where there is more dirt than rocks. Cue the giant mosquitoes.
Mission accomplished! No mutant mosquito is going to crash this party.
Our time spent on the King’s Throne trail is something we’ll remember for the rest of our lives. It’s just one of those incredibly awesome things. It was difficult and a little scary at times, but the payoff was priceless. It was not only about the incredible views that were presented to us from our vantage point up at the top, but also the immense satisfaction and sense of accomplishment that we got from being able to push ourselves and overcome the difficulties of such a hike. The Yukon is a special kind of place that keeps calling you back for more. I know that both my wife and I will be heading back up there the very next chance we get.
Thanks to my wife for being patient and grabbing some great action shots along the trail. 🙂
Copyright © 2015, Ben Aerssen. All rights reserved.
Filed under Hiker's Hangout, Hiking, Trails

Up until this year, I have never gone out and tried snowshoeing. It’s probably really weird to hear an outdoorsy Canadian admit to that. I guess my hesitation can be linked to snowshoeing looking a lot more complicated and awkward than it actually is. It turns out that you’re no longer strapping a pair of wonky tennis rackets onto your feet and walking bow legged down the trail. With the numerous technological advancements that have been made in the snowshoe industry, it’s now dead simple to get into a pair of snowshoes. The GV Mountain Trail snowshoes will allow you to get up and going in no time.
Ratchet time! Just a few cranks to lock in a snug fit.
Cons:
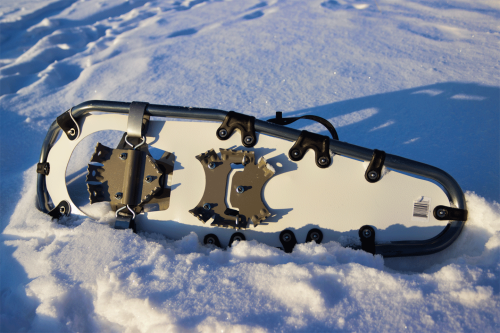
The belly of the beast. Crampons will give you the grip you need on slippery hills.
Review:
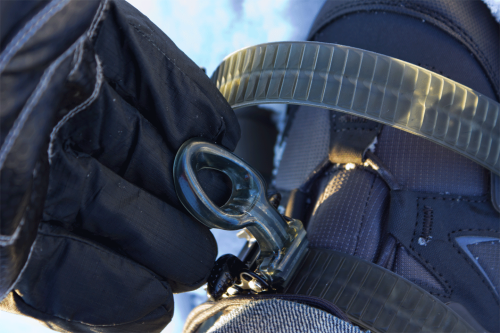
The GV Mountain Trail snowshoes are a good mid-level snowshoe. They’re not entry level, but they’re also not in the expensive, super-decked-out-high-end category. One of the biggest selling features for me here is the ratchet buckle system. They’re so easy to tighten and loosen that you can even work the buckles while wearing thick winter gloves. All you have to do is stick your foot into the binding, tighten both straps using the ratchet buckles (so that they’re snug) and tighten the heel strap. Done. No more than 30 seconds. The only minor annoyance when putting these snowshoes on, is that there is no toe bucket to use as a guide. The toe bucket sits at the front of the binding and is a quick indicator that your foot is positioned properly in the binding. Without the toe bucket, you have to position your foot by sight and feel. However, this isn’t hard to figure out and comes with a little practice. The ball of your foot should be sitting at the pivot joint near the front of the binding. Want to loosen the straps? Just grip the wings on the side of the ratchet lever and pull. Voilà! The strap has released your foot from its sturdy clutches.
The narrow design of the snowshoes is great. It means you’re actually able to walk normally while they’re on your feet. The frame is made of strong, lightweight aluminum. I have noticed that after a few treks out in various different terrain types, the coating or paint on the frame has gotten a little scratched in places. To be fair, rocks and fallen tree stumps are very hard surfaces, even more so in the frigid winter temperatures. The frames are not dented in any way though. The decks of the snowshoes are made of a durable plastic that uses Entech™ technology. The company states that the Entech™ decks are more durable, can resist extreme temperatures down to -50° Celsius (-58° Fahrenheit), prevents friction on the deck bottom and generates 50% less plastic waste. Not too shabby. Good job on reducing plastic waste GV; you get extra points for that one. The crampons feel sturdy and offer great grip when traveling up or down inclines. During our outing the other night, we had to cross a bare patch of paved road. We were a little worried about what might happen to the crampons as we crossed. When we were done, we did a thorough inspection of the bottoms of the snowshoes. The crampons were fine; no bending or dents, not even scuffed paint.
GV is a purely Canadian company, with their base of operations located in Quebec. They locally source the materials to manufacture their many snowshoes; another win in my books.

Layered up and heading out for some exercise in the freshly snow-covered field.
Final Thoughts:
Copyright © 2015, Ben Aerssen. All rights reserved.
Filed under Gear, Hiker's Hangout, Winter
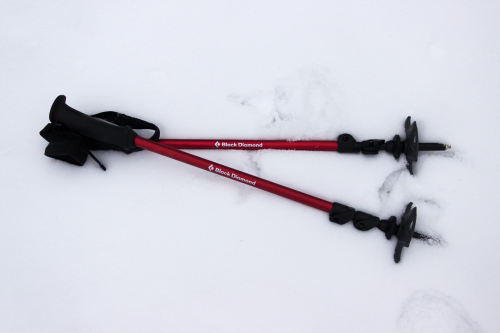
Some people might argue that hiking poles are glorified walking sticks. Why not just grab a stick on the side of the trail and use that instead? This manner of thinking is why hiking poles get kind of lumped into that group of gear that is considered a “nice to have” for some hikers. There’s absolutely nothing wrong with that; to each their own as the saying goes. However, after trying out a pair of poles while hiking on a glacier in Alaska, I was instantly sold. When I got back to civilization, I ended up purchasing the Black Diamond Trail Back hiking poles.
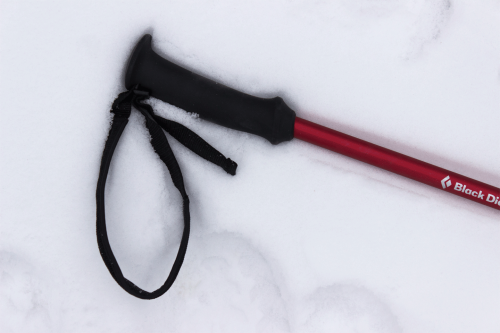
Simple rubber hand grip. Grip it and rip it.
Pros:
Cons:
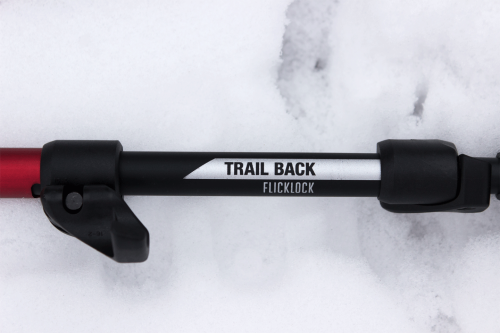
The FlickLock® system in action. Clever design.
Review:
The Black Diamond Trail Back hiking poles come with a hand grip made of rubber. While I find this to be comfortable and perfectly serviceable, others might find they need the extra padding offered by dual-density foam. That being said, you’ll also be dishing out more cash for the foam hand grips as they’re only offered on more expensive models. One of the main draws to these poles is how easy it is to adjust their height. You open the FlickLocks®, adjust the height, close the FlickLocks® and continue along your hike. It’s so easy, adjustments can even be done on the fly. Just watch your footing. The poles also come with height markers printed directly on the legs for you to use as a guide when setting them up from their collapsed position. After adjusting the height, they stay locked in position. The FlickLock® system does not come loose and start sliding down when in use. During several difficult hikes (like hiking up two mountains in the Yukon for example), I’ve never had these poles bend or bow out when supporting most of my body weight on some risky descents. These poles are very sturdy. Even though they are made of aluminum, they are fairly light-weight at 525 grams. Although, for the hiker that counts every gram, there are lighter options. The poles are easy to store with a collapsed height of only 65.5cm (25 inches). The “fire red” colour on the upper body make them fairly easy to spot in different environments if you happen to lay them down. With the addition of removable powder baskets, these poles are great to use in the winter for snowshoeing. The poles are also very useful on icy trails. For me, there are only two real drawbacks when it comes to these hiking poles. Firstly, the price point for these poles is fairly high, but I wanted a decent pair of poles that will last a long time. Secondly, these are made overseas. Unfortunately, this seems to be the case with most of the hiking poles I have seen.
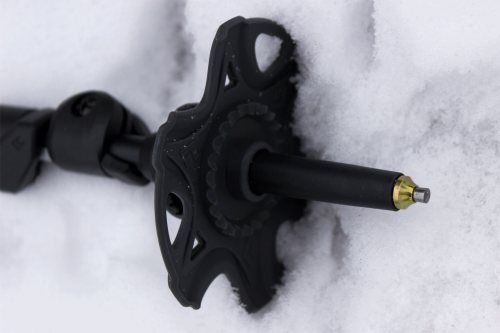
The powder baskets are on and ready to break some trails!
Final Thoughts:
Copyright © 2015, Ben Aerssen. All rights reserved.
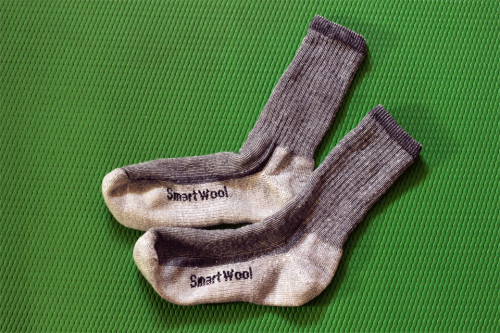
Socks have one of the most important jobs out of all your hiking gear. They’re one half of the dynamic duo that help keep your feet dry and comfortable out on the trails (you’ll need good boots too!). Your feet are taking the most abuse of all your body parts when hiking. They’re helping to absorb a good chunk of the force and weight of your body (plus the weight of your pack) as you’re moving along. They’re also simultaneously acting as a lever to propel you forward, while responding to the uneven terrain surfaces to keep you upright. Needless to say, a lot of things are going on with your feet. If your feet aren’t comfortable, you really can’t hike properly. When you can’t hike properly, you get grumpy and possibly start taking out your anger on fellow hikers by cursing and throwing things. This is no good. When it comes to choosing a hiking sock, you should take the time and do your research. Luckily, the Internet is full of helpful people offering real-world reviews. Here’s my take.
Pros:
Cons:
Review:
The benefits of the SmartWool hiking socks might not be immediately apparent while you’re standing in the store looking at a seemingly mundane pair of wool sacks that go on your feet. While I could tell you to try wearing a pair of cotton socks out on the trail instead of wool, I really don’t want any potential fiery death rage flung in my general direction because you now have some nice blisters (or worse). While these socks are a bit more on the pricey side, you do get what you pay for. SmartWool socks are super tough. I’ve had my 1st pair now for several years and after severe use, they don’t yet have any holes. The only issue I’ve encountered is that the socks do pill a bit in some areas. I guess this is to be expected after being used and washed many times though. I only recently bought another pair to have on hand just in case. SmartWool socks are very comfortable. The foot bed has a nice cushion and there’s enough room so that your toes aren’t crushed together. The packaging states that these socks have a blister free fit. I’m going to have to agree with the company on this one. While wearing these socks, I’ve never once had any blisters. I’m not saying you will never get blisters while wearing these socks because they are some sort of magical foot pouches. I would imagine that if they became wet and the hotspots of your feet were constantly rubbing against your boot for many kilometers, then logic dictates that blisters are bound to form eventually. The SmartWool socks are constructed with a bit of nylon for elasticity purposes. Because of this, once they’re pulled up, they don’t fall down. When I’m out hiking, my feet are dry in these socks. They do their job well by wicking away any sweat. Want another solid reason to buy these? SmartWool socks are made in the USA.
Final Thoughts:
Copyright © 2015, Ben Aerssen. All rights reserved.


